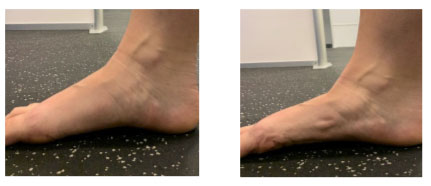
HOME EXERCISE PROGRAM Post-Operative Foot/Ankle
Phase 1: Weeks 0-6
Goals:
- Slowly increase ankle range of motion within surgical guidelines
- Decrease pain and swelling
- Strengthening core, hip, knee, arms, and feet while protecting the ankle. No ankle strengthening during this phase
Recommendations:
- Avoid excessive standing and walking
- Maintain weight-bearing status: Non weight-bearing, unless otherwise instructed by surgeon
- Apply cold pack to your ankle for 15-20 minutes 3-4x/day. Place a paper towel or pillowcase on your ankle to protect your skin
- Exercises should be pain free and within limits defined by your surgeon in your postoperative instructions
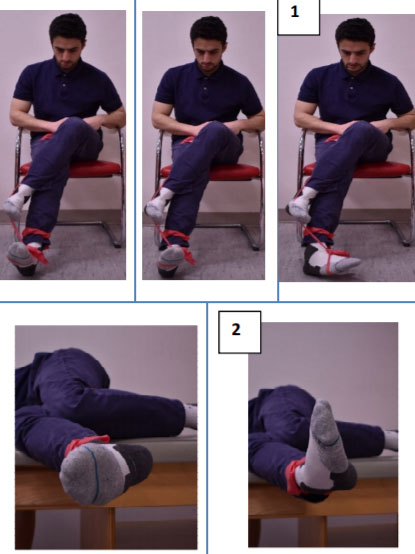
Ankle Range of Motion (ROM) Exercises
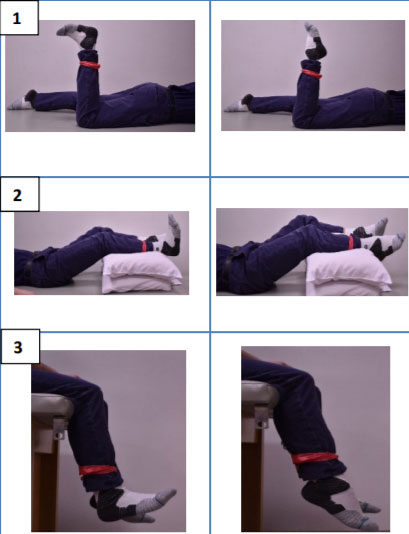
Ankle Pumps
- Please see pictures for progression of this exercise:
- On your stomach with your knee bent
- On your back with your leg elevated with your knee bent and supported by pillows
- Seated in a chair or the edge of the bed with your knee bent
- With swelling, it is best to do this with your leg elevated [1], [2].
- If it is difficult to lie on your stomach [1], then begin with [2].
- Gently bend and straighten your ankles like stepping on and off a gas pedal.
- Bend your ankle to bring your toes toward you. Hold for 2 seconds.
- Point your toes like pushing a gas pedal. Hold for 2 seconds
Perform 30x, 2-3 sets, 3x/ day
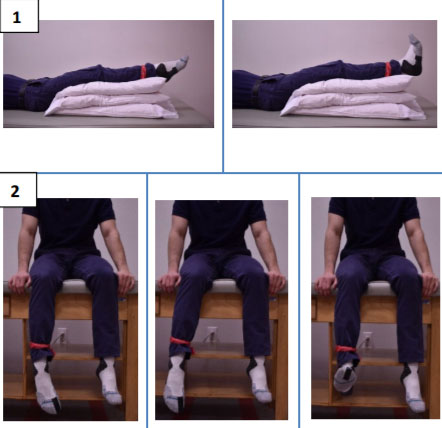
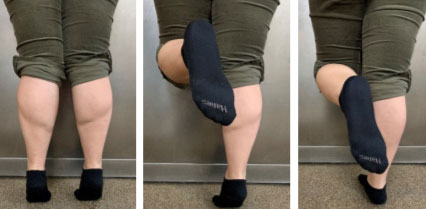
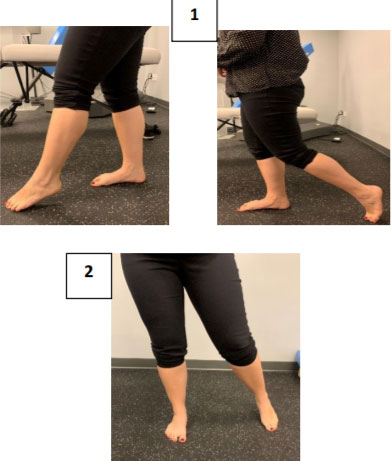
Ankle Alphabets
- Please see pictures for progression of this exercise:
- On your back with your leg elevated with your knee bent and supported by pillows
- Seated in a chair or the edge of the bed with your knee bent
- With swelling, it is best to do this with your leg elevated [1].
- Trace big, capital, block letters of the alphabet, as if writing with your big toe.
- Move only your ankle and foot in a slow, gentle, and controlled fashion.
- Avoid knee or hip movement.
Perform 2x, 1 set, 3x/ day
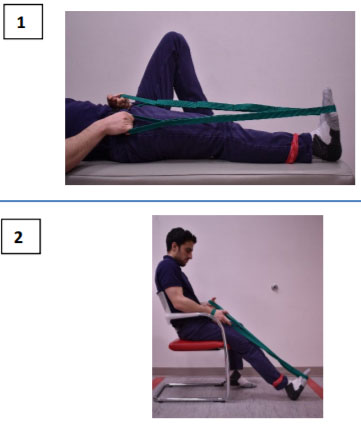
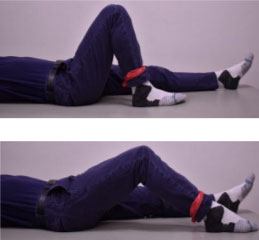
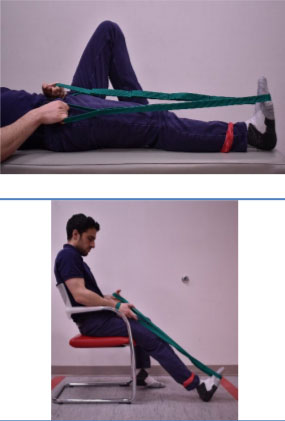
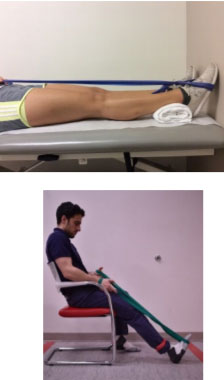
Ankle Dorsiflexion ROM (Knee Bent)
- Please see pictures for progression of this exercise:
- On your back with your leg elevated with your knee bent and supported by pillows
- Seated in a chair or the edge of the bed with your knee bent
- With swelling, it is best to do this with your leg elevated [1].
- Place a strap (belt or towel) around the ball of your involved foot.
- Hold the other end of the strap with your hands.
- Gently pull your toes toward you until you feel a stretch in the back of your calf.
- Hold for 10 seconds.
Rest for 10 seconds.
Perform 3x, 2-3x/ day

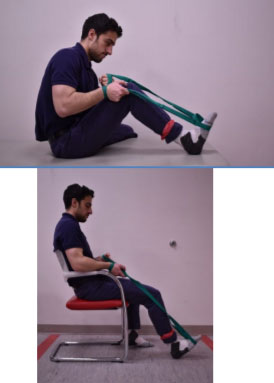
Calf Stretch (Knee Straight)
- Please see pictures for progression of this exercise:
- On your back with your knee straight. Bend your other leg.
- Seated in a chair or the edge of the bed with your knee straight
- With swelling, it is best to do this with your leg elevated [1].
- Place a strap (belt or towel) around the ball of your involved foot. Hold the other end of the strap with your hands.
- With your hands gently pull the strap/towel (foot) towards you. You will feel a stretch in your calf and behind your knee.
- Hold for 10 seconds.
- Rest for 5 seconds.
Perform 10x, 2-3x/ day
Toe Curl with Towel
- Sit in a chair with your feet on the ground on top of a towel.
- It is best to do this on a uncarpeted floor
- Curl your toes to squeeze/crunch up the towel.
- Avoid moving the ankle, knee, or hip.
- When you get to the end of the towel, straighten it, and repeat.
- If the towel isn’t moving, do 10 scrunches.
Perform 3x, 3 sets, 2x/ day

Arch Doming
- Sit in a chair with your foot on the floor.
- Shorten your foot and lift your arch by tightening the muscles on the bottom of your foot.
- Hold for 3 seconds.
- Keep your toes on the floor.
- Avoid moving the ankle or curling the toes.
- Relax and repeat as above.
Perform 10x, 1 to 2 sets, 1-2x/ day
Leg Strengthening
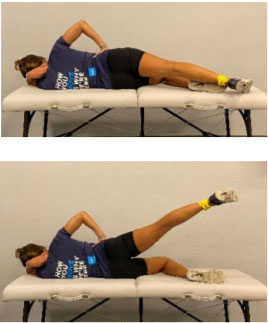
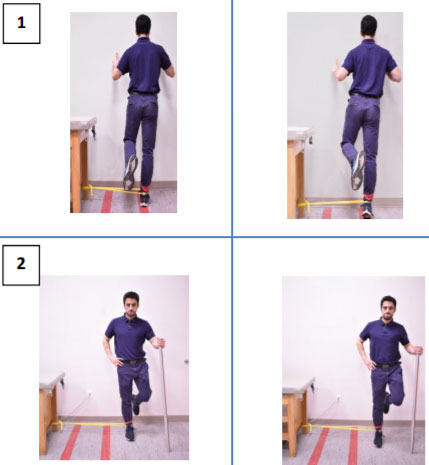
Hip Abduction Straight Leg Raise (Side lying)
- Lie on your side with your involved leg on top, and your hips stacked on top of each other.
- Keep your top leg straight (use a brace if recommended by your physician) and bend your lower leg slightly.
- Keeping your involved leg in line with your body, tighten your stomach, tighten your quadriceps, and raise your top (involved leg) straight up.
- Do not let your top leg move forward or your hip to rotate back.
- Hold for 1 second, slowly lower
Perform 10x, 1 set, 3x/ week
Advance to 2 sets, then 3 sets as tolerated
When the exercise is less challenging, increase the repetitions or add a light weight around your calf in 1lb. increments
Hip Extension Straight Leg Raise (Lying on Your Stomach)
- Lie on your stomach with a pillow under your hips.
- Tighten your stomach and buttocks
- Keeping your involved knee straight, lift your involved leg off the bed without arching your back.
- Hold for 1 second, slowly lower.
Perform 10x, 1 set, 1-2x/ day, 4-5 days/ week
Advance to 2 sets, then 3 sets, as tolerated.
When the exercise is less challenging, increase the repetitions or add a light weight around your calf in 1lb. increments
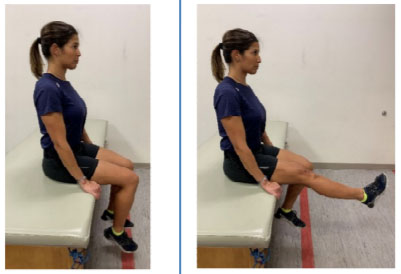
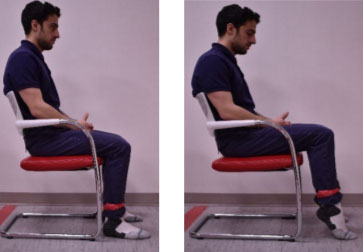
Knee Extension: in Sitting
- Sit at the edge of a chair or bed. You can lean back on your hands.
- Straighten the knee of your involved leg towards the ceiling until it is fully straight. If you tightness behind your thigh, lean back on your hands.
- Hold for 1 second.
- Slowly return to the start position.
- Do not continue if this exercise causes pain in your knee
*Check with your doctor before doing this exercise.
Perform 10x, 3 sets, 3x/ week
When this exercise is less challenging, add a light weight around your calf or increase the repetitions Progress weights as tolerated.
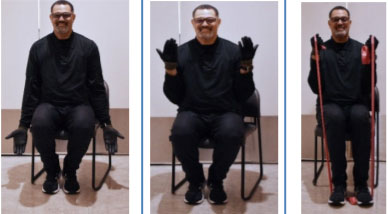
Arm Strengthening in Sitting
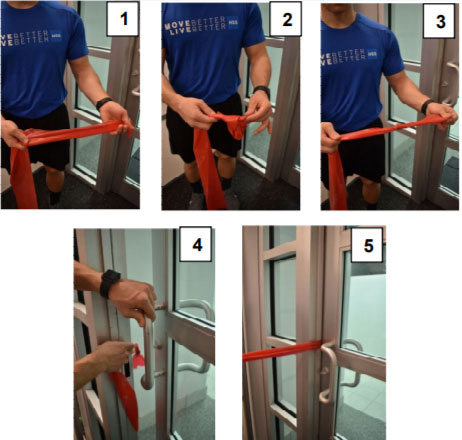
Band Set Up
- Take an elastic band
- Tie a single loop toward the end of the band
- Pull knot tight
- Open door
- Close knot tightly in doorway
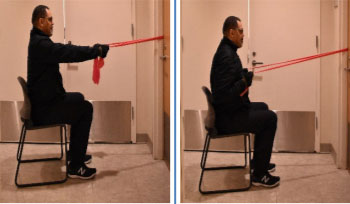
Scapular (Shoulder Blade) Retraction = Row in Sitting
Band Set Up
- Attach knotted resistance band in a door as described in “Band Set Up”.
- Sit in a chair holding each end of the band in each hand.
- Bring your shoulder blades back to squeeze them together.
- Allow your arms to follow along while bending your elbows.
- Then slowly release your shoulder blades as you return to starting position with your arms in front of you.
- Focus on shoulder blade rather than arm motion.
Perform 10x, 3 sets, 4-5x/ week
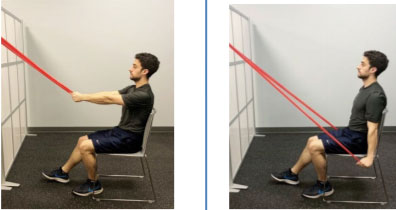
Shoulder Extension with Band in Sitting
- Attach knotted resistance band in a door as described in “Band Set Up”.
- Sit in a chair. Start motion by holding the elastic band in front of you with your elbows straight.
- Maintain your hands in a neutral (shake hands) position.
- Pull the band down and back towards your side.
- Hold for 2 seconds then slowly return to starting position.
Perform 10x, 3 sets, 3x/ week
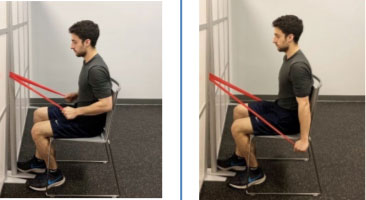
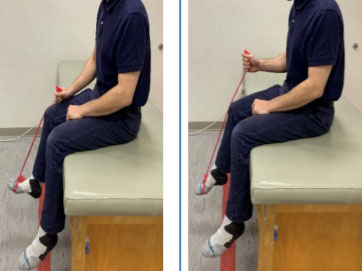
Triceps Extension with Band in Sitting
- Attach knotted resistance band in a door as described in “General Recommendations.”
- Sit holding the band with your elbows bent.
- Straighten your elbows.
- Hold for 1 second.
- Slowly return to starting position
- Increase resistance as tolerated.
Perform 10x, 3 sets, 4-5x/ week
Biceps Curls in Sitting
- Sit in a chair with both arms straight and your palms facing forward.
- Bend your elbows.
- Hold for 2 seconds.
- Slowly return to starting position.
- Increase resistance as tolerated.
- Recommend increasing resistance by 1lb increments every 2 -3 sessions.
Perform 10x, 3 sets, 3x/ week
When exercise becomes less challenging increase resistance by holding weights in your hands or using an elastic band
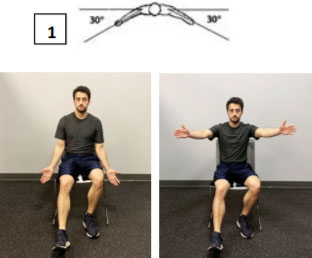
Shoulder Flexion in V formation: “Scaption” in Sitting
- Sit in a chair with both arms at your side with your thumbs pointing forward.
- Raise your arms in a forward/lateral direction (a V formation, viewed from above [1]).
- Do NOT raise your arms above shoulder height
- Your elbows are straight and thumbs are up so that your palms face each other.
- Best performed in front of a mirror so to see that your involved shoulder doesn’t shrug up
- Hold for 1 seconds, then slowly lower,
- Start with 0 lbs., and then add weight as exercise with good form becomes easy. Progress in ½ to 1lb increments.
- Do not lift more than 5lbs.
Perform 10x, 3 sets, 3x/ week
Phase 2: (weeks 7-12)
Goals:
- Minimize pain and swelling.
- Maximize range of motion (within prescribed post-operative guidelines).
- Initiate ankle strengthening exercises.
- Continue exercises in phase I until you find them less challenging.
- Progress strengthening of core, hip, knee, upper extremity, and foot musculature.
General Recommendations:
- Weight-Bearing Status: Partial Weight-Bearing unless otherwise instructed by surgeon.
- You are ready to progress to this phase if:
- Pain and swelling are controlled.
- You are comfortable walking using the weight-bearing precautions and assistive device requirements given to you by your surgeon.
- You have noticed a significant improvement in strength from performance of phase I exercises.
- You have noticed improvements in range of motion with the exercises in Phase I.
- Continue to apply cold pack to your ankle for 15-20 minutes 1-2x/day. Place a paper towel or pillowcase on ankle to protect your skin.
- Continue to limit excessive amounts of standing and walking.
- All exercises should be pain free.
Perform 10x, 3 sets, 3x/ week
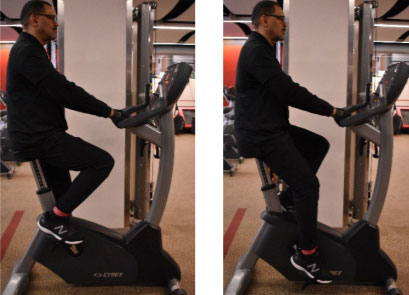
Stationary Bicycle
- Stand next to the bike. Adjust the seat height so that it is level with your hip joint.
- Sit up straight on a stationary bicycle holding onto the handle bar.
- Adjust the seat height so that:
- Your knees are slightly bent with your foot in the down position.
- Your knees do not bend past your hips at the top of the motion.
- Pedal on the bicycle with minimal resistance.
- Keep your neck and shoulders relaxed.
Perform for 10 minutes, 1x/ day, 4-5 days/ week.
Gradually increase the time on the bike by 5 minutes weekly
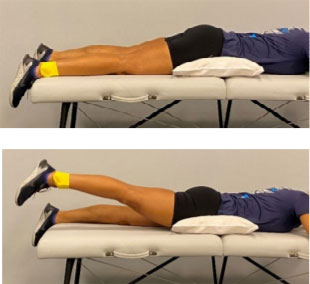
Ankle Range of Motion (ROM and Flexibility
Ankle Plantar Flexion ROM: Slides
- Lie on your back with your involved leg bent and you uninvolved leg straight
- Keep the foot of your involved leg flat on the table.
- Slowly straighten your involved leg until you cannot without your foot lifting off the table.
- Return to starting position and repeat as above.
Perform 10x, 3 sets, 2-3x/ day
Calf Stretch with Knee Straight
- Lie on your back with your legs out straight in front of you or sit with your legs off the edge of a chair.
- Loop a strap or towel around the toes of foot. Hold the other end with your hands.
- Gently pull your toes toward you until you feel a stretch in the back of your calf.
- Hold 30 seconds.
- Keep your knee straight throughout.
Perform 3x, 2-3x/ day, 7 days/ week
Calf Stretch with Knee Bent
- Lie on your back with your knee bent or sit with your legs off of the edge of a chair
- Loop a stretch strap or long towel around the toes of your involved foot. Hold the other end with your hands.
- Gently pull your toes toward you until you feel a stretch in the back of your calf.
Perform 3x, 2-3x/ day, 7 days/ week
Calf Strengthening Progression
Heel Raise Progression
When the previous exercise becomes easy, progress to the next exercise.
- Sit in a chair with your feet on the floor.
- Press through the big toes of both feet using the muscles of your calves to lift heels off of ground.
- Focus on keeping the pressure on the inside, rather than outside, of your feet.
- When your heels have reached maximum height, pause for 1 second at the top of the motion.
- Use the muscles of both calves to slowly return your heels to starting position.
Perform 10x, 3 sets, 2x/ day, 4-5 days/ week
Ankle Plantar Flexion With Band
- Sit in a chair or on a firm table with both legs bent over the edge.
- Tie a loop towards at end of the resistance band.
- Place the band loop around the ball of your involved foot.
- Hold the other end of the band taut with your hands.
- Press your foot down as if pressing on a gas pedal to feel the effort in your calf muscles. Hold for 2 seconds.
- Slowly return to the starting position.
- Rest for 1 second.
Perform 10x, 2-3 sets, 2x/ day, 4-5x/ week
When this exercise becomes less challenging, you can increase the repetitions or increase the resistance of the band.
Ankle Plantar Flexion With Knee Straight and Band
- Lie with your knee straight or sit with your foot supported on the floor.
- Press through the big toes of both feet using the muscles of your calves to lift heels off of ground.
- Focus on keeping the pressure on the inside, rather than outside, of your feet.
- When your heels have reached maximum height, pause for 1 second at the top of the motion.
- Use the muscles of both calves to slowly return your heels to starting position.
Perform 10x, 3 sets, 2x/ day, 4-5 days/ week
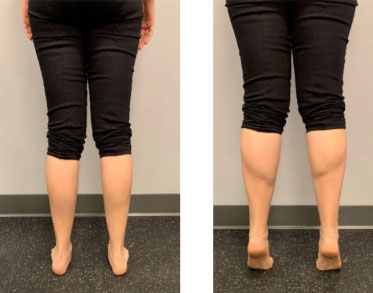
Double Leg Heel Raises Standing On Ground
- Stand approximately 6 inches away from a wall or countertop.
- Hold on lightly for balance.
- Press through the big toes of both feet using the muscles of your calves to lift your heels off of the ground.
- Focus on keeping the pressure on the inside, rather than outside, of your feet.
- When your heels have reached maximum height, pause for 1 second at top of motion.
- Use the muscles of both calves to slowly return your heels to starting position.
Perform 5x (progress to 10x as tolerated), 3 sets, 4-5 days/ week
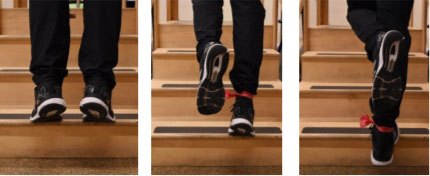
Ankle Eversion With Band
- Sit in a chair both legs bent
- Tie a loop towards one end of the band.
- Place the loop around the ball of the involved foot, and wrap the loose end around your uninvolved foot.
- Hold the band taut with your hands.
- The tension of the band should be pulling your involved foot toward your uninvolved.
- Roll your involved ankle up and outward as shown. Keep the rest of the leg still.
- Hold for 1 second.
- Slowly return to starting position.
- You can progress this exercise by increasing the range of motion for the exercise [1].
- If you do not have an elastic band for resistance, perform the movement in side-lying against gravity [2].
Perform 10x, 2-3 sets, 2x/ day, 4-5days/ week
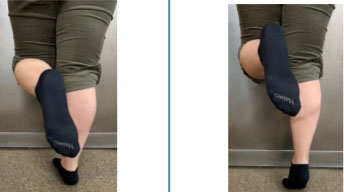
Ankle Inversion With Band
- Sit with both legs bent.
- Tie a loop towards one end of the band.
- Place looped band around ball of the involved foot.
- Cross your uninvolved foot over your involved foot and wrap the loose end of the band around your uninvolved foot. Hold the band taut with your hands.
- The tension of the band should be pulling your involved foot upward and outward, toward your uninvolved foot.
- Perform the exercise by pointing your involved foot inward and downward, as shown. Hold for 1 second.
- Slowly return to starting position.
- Make sure to keep the rest of the leg still.
- You can progress this exercise by increasing the range of motion for the exercise [1].
- If you do not have an elastic band for resistance, perform the movement in sidelying against gravity [2].
Perform 10x, 2-3 sets, 2x/ day, 4-5x/ week
Phase 3: (Weeks 12 +)
Goals:
- No pain or swelling before, during, or after activity.
- Normalize ankle ROM.
- Normalize ankle strength.
- Maximize flexibility and balance.
General Recommendations:
- Weight-Bearing Status: Full Weight-Bearing unless otherwise instructed by surgeon.
- You are ready to progress to this phase if:
- Pain and swelling are controlled.
- You are able to walk bearing full weight on the involved leg without any compensation.
- -You notice that your ankle range of motion is nearly equal to your uninvolved ankle and that you an easily calf raise with equal weight on both legs.
- Continue apply cold pack to your ankle as needed for 15-20 minutes 1/day. Place a paper towel or pillowcase on ankle to protect your skin.
- Exercises should be pain free.
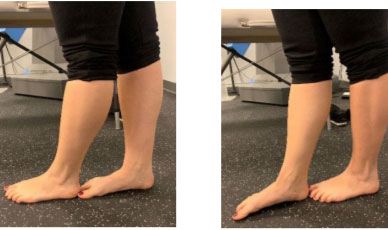
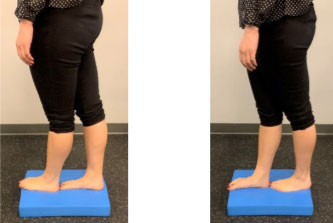
Standing Calf Stretch (Knee Straight)
- Stand with your hands leaning on a wall or counter
- Place your involved foot behind you and bend your front knee
- Keep your back involved knee straight and let your hips to sag forward toward the wall or counter to feel a stretch in your calf
- Hold for 30 seconds.
- Rest for 5 seconds.
- Do not let your back foot rotate outward.
- Do not let your heel lift up.
Perform 3x, 2-3x/ day, 7 days/ week
Standing Calf Stretch (Knee Bent)
- Stand with your hands leaning on a wall or counter.
- Place your involved foot behind you and bend your front knee.
- Bend your involved knee slightly to feel a stretch lower in your calf.
- Hold for 30 seconds.
- Rest for 5 seconds.
- Do not let your back foot rotate outward.
- Do not let your heel lift up.
- Keep your back knee slightly bent.
- Do not let your back foot rotate outward.
- Do not let your heel lift up.
Perform 3x, 2-3x/ day, 7 days/ week
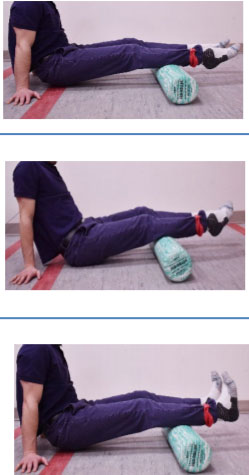
Foam Rolling Calf Musculature
- Sit on the floor with both calves on the roller.
- Keep your hands on the floor behind you and lift your buttocks.
- Roll up and down along the length of your calves.
- Rotate your lower leg in and out 2x, every 2 inches as you roll up your calf. Stop just before the back of the knee and roll back down again.
- Point your toes and bend your ankle to bring your toes toward you. Continue this sequence every 2 inches up the back of the calf until reaching just below the knee.
- Then roll up and down entire calf 3-5 times
- Do not let your heel lift up.
Perform 5x, 2x/ day, 7 days/ week
Progress by foam rolling with one calf on the foam roller at a time
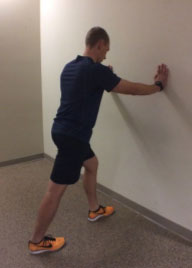
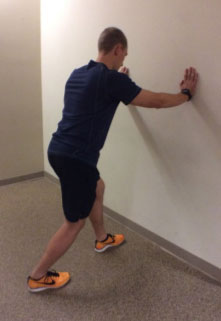
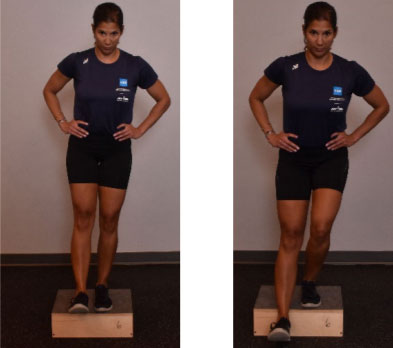
Ankle Dorsiflexion Mobilization Weight-Bearing
- Start in a ½ kneeling position with involved foot forward.
- Gently bend your knee, lunging to allow your knee to come over your toes.
- Place a thick elastic band around your ankle for more mobilization.
- Hold for a few seconds.
- Return to starting position.
Perform 3 sets, 1-2x/ day, 7 days/ week
Heel Raise Progression
When the previous exercise becomes easy, progress to the next exercise.
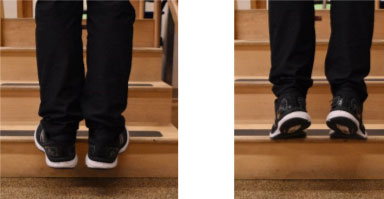
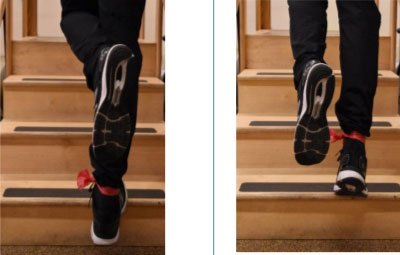
Double Leg Heel Raises Standing On Step
- Stand with your toes on the edge of a step, with heels hanging off.
- Hold on lightly for balance.
- Press through the big toes of both feet using the muscles of your calves to lift your heels off of the ground.
- Keep the pressure on the inside, rather than outside, of your feet.
- When your heels have reached maximum height, pause for 1 second at the top of the motion.
- Use the muscles of both calves to slowly return your heels to starting position.
Perform 10x, 3 sets, 4 days/ week
Eccentric Heel Raises Standing On Ground
- Stand approximately 6 inches away from a wall or countertop.
- Hold on lightly for balance.
- Press through the big toes of both feet using the muscles of your calves to lift your heels off of the ground.
- Keep the pressure on the inside, rather than outside, of your feet.
- When your heels have reached maximum height, pause for 1 second. Lift your uninvolved foot off of the ground so that you are standing on your involved toes only.
- Use the muscles of your involved calf to slowly return your involved heel to starting position.
Perform 10x, 3 sets, 4 days/ week
Eccentric Heel Raises Standing On Step
- Stand with your toes on the edge of a step, with heels hanging off.
- Hold on lightly for balance.
- Press through the big toes of both feet using the muscles of your calves to lift your heels off of the ground.
- Keep the pressure on the inside, rather than outside, of your feet.
- When your heels have reached maximum height, pause for 1 second at the top of the motion and lift your uninvolved foot off of the ground so that you are standing on your involved toes only.
- Use the muscles of your involved calf to slowly return your involved heel to starting position
Perform 10x, 3 sets, 4x/ week
Single Leg Heel Raises Standing On Ground
- Stand approximately 6 inches away from a wall.
- Hold on lightly for balance.
- Lift your uninvolved foot off of the ground so that you are standing on your involved foot only.
- Press through the big toe of your involved foot using the muscles of your calf to lift your heel off of the ground.
- Keep the pressure on the inside, rather than outside, of your foot.
- When your heel has reached maximum height, pause for 1 second at the top of the motion and slowly return to starting position.
Perform 10x, 3 sets, 4x/ week
Single Leg Heel Raises Standing On Step
- Stand with your toes on the edge of a step, with heels hanging off.
- Hold on lightly for balance for balance.
- Lift your uninvolved foot off of the step so that you are standing on your involved foot only.
- With your uninvolved foot suspended in the air, press through the big toe of your involved foot using the muscles of your calf to lift your heel up
- Keep the pressure on the inside, rather than outside, of your foot.
- When your heel has reached maximum height, pause for 1 second at the top of the motion and slowly return to starting position.
Perform 10x, 3 sets, 4 days/ week
Single Leg Heel Raises Standing With Band
- Tie a resistance band to a sturdy object and loop the other end of the resistance band around the outside of your involved ankle [1].
- Hold on lightly for balance.
- Stand on your involved foot only.
- Press through the big toe of your involved foot using the muscles of your calf to lift your heel up, resisting the pull of the band throughout.
- Keep the pressure on the inside, rather than outside, of your foot.
- When your heel has reached maximum height, pause for 1 second at the top of the motion and slowly return to starting position.
- Turn around so the resistance band is around the inside of your ankle pulling in the opposite direction [2].
Perform 10x each direction, 2 sets, 4 days/ week
Balance Progression
When the previous exercise becomes easy, progress to the next exercise.
Balance: on Floor Narrow Base Of Support
- Stand next to the kitchen counter or another stable surface.
- Stand with your feet right next to each other.
- Use upper extremity support as needed.
- Balance for 30 seconds.
Perform 3x, 1-2x/ day, daily
Balance: Tandem Stance On Floor
- Stand next to the kitchen counter or another stable surface.
- Bring one foot directly in front of the other.
- Use upper extremity support as needed.
- Balance for 30 seconds.
Perform 3x, 1-2x/ day, daily
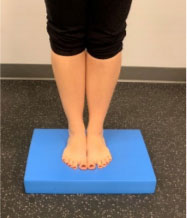
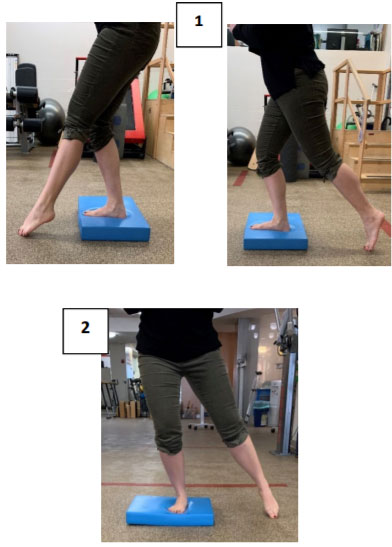
Balance: Narrow Base of Support on Uneven Surface
- Stand next to the kitchen counter or another stable surface.
- Step onto foam pad or pillow. Bring your feet right next to each other.
- Use upper extremity support as needed.
- Balance for 30 seconds.
Perform 3 sets, 1-2x/ day, 4-5 days per week
Balance: Tandem Stance on Uneven Surface
- Stand next to the kitchen counter or another stable surface.
- Step onto foam pad or pillow.
- Bring one foot directly in front of the other.
- Use upper extremity support as needed.
- Try to balance for 30 seconds.
Perform 3 sets, 1-2x/ day, 4-5 days per week
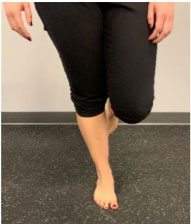
Balance: Single Leg Stance On Floor
- Stand next to the kitchen counter or another stable surface.
- Stand on your involved foot.
- Avoid shifting your hips.
- Use upper extremity support as needed.
- Try to balance for 30 seconds.
Perform 3x, 1-2x/ day, 4-5 days/ week
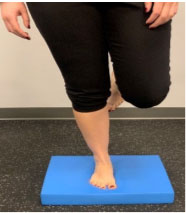
Balance: Single Leg Stance On Uneven Surface
- Stand next to the kitchen counter or another stable surface.
- Stand on a foam pad or pillow on your involved foot.
- Lift uninvolved leg up bringing your knee up to hip height.
- Avoid shifting your hips.
- Use upper extremity support as needed.
- Try to balance for 30 seconds.
Perform 3x, 1-2x/ day, 4-5 days/ week
Balance: Single Leg Stance On Floor With Opposite Hip Movements
- Stand next to the kitchen counter or another stable surface
- Stand on your involved leg with the other leg slightly behind you resting on your toes.
- Engage your core and glute muscles as you bring your leg [1] backwards and forward, then bring it out to the side [2].
- Keep the knee of involved leg slightly bent.
- Do not arch your back - these are small movements.
Perform 15x, 2 sets, 1x/ day, 4 days/ week
Balance: Single Leg Stance On Uneven Surface With Opposite Hip Movements
- Stand next to the kitchen counter or another stable surface
- Stand on your involved leg on a foam pad or pillow with your other leg slightly behind you resting on your toes.
- Engage your core and glute muscles as you bring your leg [1] backwards and forwards, and [2] bring it out to the side.
- Keep the knee of the involved leg slightly bent.
- Do not arch your back, these are small movements.
Perform 5x (progress to 10x), 2 sets, 1x/ day, 4 days/ week
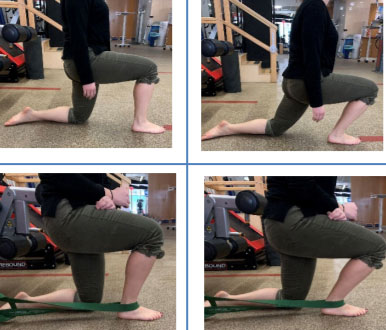
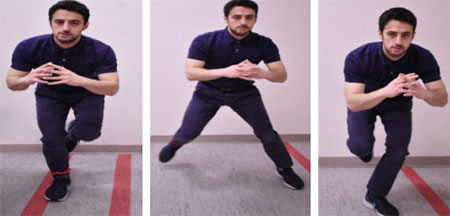
Forward Lunge
- Stand with your feet hip width apart.
- Take a step or lunge forward with your right foot. Lower your body as you bend your right hip and knee, keeping your right foot in line with your ankle. Keep your abdominals engaged and spine in a straight line
- At the same time your left knee will bend into a half kneeling position, without letting your knee touch the floor. Pause for 1 second.
- Keep your weight on your front leg – the back leg is just a kickstand.
- Push yourself back up into the starting position with your front foot.
- Repeat this exercise leading with your left leg.
Perform 10x, advancing to 3 sets, 3x/ week
When the exercise becomes less challenging, you may hold a weight in your hands
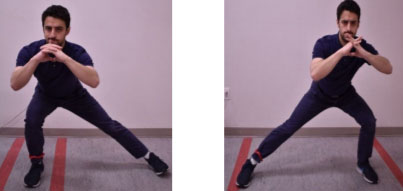
Lateral Lunge
- Stand up tall with feet hip width apart.
- Take a step sideways and squat down with that leg, keeping the other leg straight.
- Stand back up pushing through your foot, bringing your foot back to the starting position.
- Switch sides and repeat.
Perform 15x, 2 sets, 4 days/ week
Side Step With Band Around Feet
- Place a resistance band around your feet. Stand in a 1/4 squat.
- Make sure your weight is between your midfoot and heel, and tighten your abdominal muscles.
- Take a step to the side and focus on keeping the knees pointing straight ahead and not caving in.
- Do not let your knees and feet get too close together or you will lose tension in the band
Perform 10 steps in one direction and then 10 steps in the opposite direction, 3- 4 sets, 4x/ week

Jumping Progression
When the previous exercise becomes easy, progress to the next exercise.
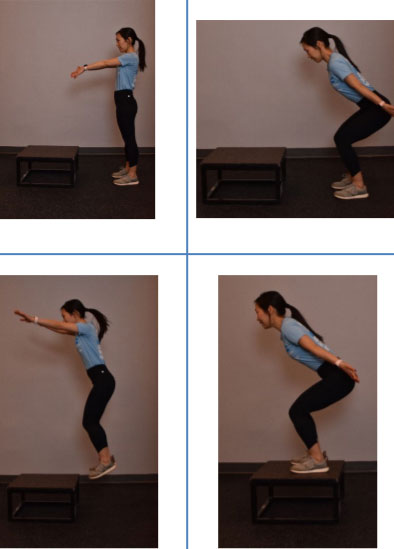
Box Jump Double Leg
- Stand facing a staircase or a stable platform with your feet hip width apart. Keep your feet hip width apart.
- Sit back as if performing a squat while at the same time pulling your arms back towards your side.
- When you reach the bottom of the squat quickly reverse directions and straighten your hips and knees while bringing your arms forward to jump up onto the step in front of you.
- Slowly land into a mini squat position trying to make as little noise as possible.
- Try to land softly in a squat position. Avoid landing with your knees straight.
- Step down backwards to return to starting position.
Perform 10x, 2 sets, 2x/ week. of 10 repetitions, advancing to 3 sets of 10 repetitions
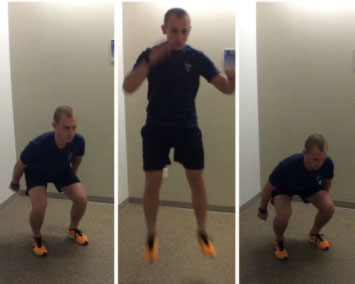
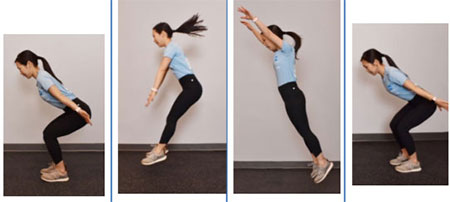
Jump in Place Double Leg
- Stand with your feet hip width apart.
- Sit back as if performing a squat while at the same time pulling your arms back towards your side.
- When you reach the bottom of the squat quickly reverse directions and straighten your hips and knees while bringing your arms forward to jump up.
- Try to land softly in a squat position. Avoid landing with your knees straight.
- Land softly on the balls of your feet then heels by sitting back into your hips and knees - a mini squat position trying to make as little noise as possible.
- Do not let your knees cave in.
Perform 10x, 2 sets, 4 days/ week
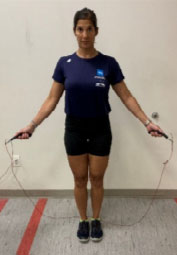
Jumping Rope
- Stand with your feet slightly closer than hip width apart.
- Jump rope on both feet with small hops.
- Keeping the knees soft.
- Avoid locking out your knees while hopping.
Perform for 30 seconds, rest for 30 seconds, 3 sets, 3x/ week. Increase to 60 seconds in 5 second increments.
If you don’t have a jump, you can perform: Pogo hops
- Begin with feet slightly closer than hip width apart.
- Take small hops while keeping the knees soft.
- Avoid locking out your knees while landing.
Perform for 30 seconds, rest for 30 seconds, 3 sets, 3x/ week. Increase to 60 seconds in 5 second increments.
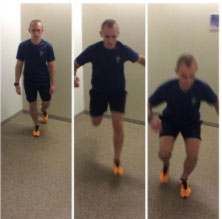
Jump in Place Single Leg
- Stand on your involved leg.
- Sit back as if performing a single leg squat while at the same time pulling your arms back towards your side
- When you reach the bottom of the squat quickly reverse directions and straighten your hip and knee while bringing your arms forward to jump up.
- Land softly on the ball of your foot then heel by sitting back into your hip and knee - a mini single leg squat position trying to make as little noise as possible.
- Do not let your knee cave in.
Perform 10x, 2 sets, 4 days/ week
Broad Jump
- Stand with your feet hip width apart.
- Sit back as if performing a squat while at the same time pulling your arms back towards your side
- When you reach the bottom of the squat quickly reverse directions and straighten your hips and knees while bringing your arms forward to jump forward.
- Land softly with your heels first by sitting back into your hips and knees - a mini squat position trying to make as little noise as possible.
- Do not let your knees cave in.
Perform 10x, 2 sets, 4 days/ week
Side to Side Jump
- Stand facing forward with good posture. Sit back as if performing a single leg squat.
- When you reach the bottom of the squat, hop sideways from your left leg and land on your right.
- Land softly sitting back into your hip and knee to absorb the shock- a mini single leg squat position trying to make as little noise as possible
- Make sure your knees don’t cave in – neither on the push-off nor the landing.
- Then push off right leg to land on left with the same good form.
- Keep your abdominals tight and torso steady.
Perform 10 times, 2 sets, 4 days per week
When this exercise becomes less challenging, gradually increase the speed or lateral distance of your hops.
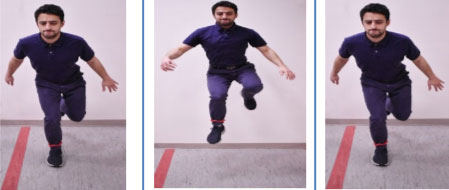
Forward Hop to Opposite Leg
- Stand tall with your feet hip width apart.
- Jump forward pushing off of your involved leg.
- Stick the landing softly on your uninvolved leg by sitting back into your hip and bending your knee.
- Repeat, pushing off of your uninvolved leg, sticking the landing softly on your involved leg.
- Do not let your knee buckle.
Perform 10x, 2 sets, on each side, 4 days/ week